
talkiejunior
New member
**How to Repair Your Broken Turn Indicator Without Soldering** Part 1
This tutorial is in two parts because I can only post 10 pictures per thread. Part two will have the other remaining photos and instructions.
I have had to repair my turn signal indicators three times now and got tired of paying $160 plus shipping each time to replace the indicator lamp. After my third break, I decided to try repairing it myself and had great success with this method. I hope this works for you and saves you money. The entire process takes under an hour, depending on how much you curse.
This method uses the materials listed below and does not require a soldering gun. If you are comfortable soldering wires and small electronic connections, go for it, as it provides a more permanent and reliable connection. If not, you can fix the entire device with glue and electrical tape.
Please note: I am not an electrical engineer or an electronics repair technician. I’m a middle school music teacher in Hawaii who spends most of his time surfing, not doing major repairs. If I can do it, pretty much anybody can.
Steps for Repairing a Broken Rear Turn Indicator
**Materials Needed:**
- Your broken indicator light and cable
- Superglue
- Scissors
- Carpet knife
- Cable crimpers and strippers
- Quarter-inch drill bits and drill
- Black Sharpie marker
- Bond welding glue
- Four strips of colored wire (preferably matching the colors used on the turn signal indicator; I cut four colored wires from a previous turn indicator)
- A wide needle or very thin torque screwdriver
- Flat pliers and needlenose pliers
- Small clamp
- Adhesive sealant
- Four insulated wire connectors
- Guitar pick or some sort of plastic separator
- Shrink wrap electrical tubing
Repair Steps
**Step 1:** Assemble your broken parts. Use scissors to cut any remaining wires connected to the turn indicator.
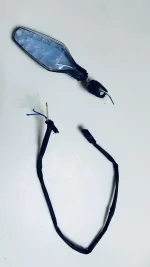
**Step 2:** Using a carpet knife, carefully remove the plastic cover from the turn signal indicator. This is one of the most difficult steps, as it’s easy to break the clear plastic cover. Work along the edges until the knife slices through the plastic. Once the edges are cut, gently use a guitar pick or similar plastic tool to fully separate the clear cover from the black plastic base. Take your time to avoid cracking the clear plastic.
**Step 3:** Remove the plastic cover, the white plastic cover over the LED board, and carefully pull out the LED signal indicator from the black plastic base.
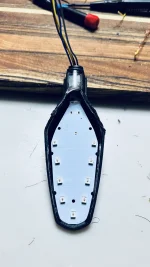
**Step 4:** With the LED board out, label all the cable wires so you know where to reconnect them later. I used a Sharpie to write directly on the PCB, but you can also take a picture for reference. Note the positions of the yellow, blue, gray, and brown cables.
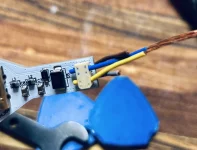
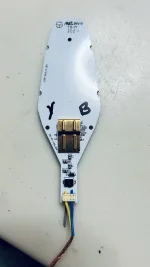
**Step 5:** If it hasn't already been sheared off, remove the small black plastic connector that connects the signal indicator case to the rear license plate holder. Use a quarter-inch drill bit to drill a hole through it for the wires to pass through.
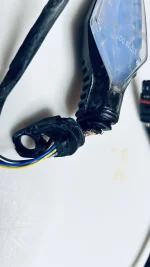
**Step 6:** Use pliers to gently hold the two connectors attached to the LED board. Carefully enlarge the holes for the wires; do not grip too tightly to avoid cracking the connectors.
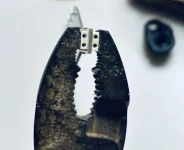
**Step 7:** Use a large sewing needle or a very fine torque screwdriver to widen the wire holes on the connectors. You should be able to pass four strands of wire through, but three is usually enough. Pull the wires through with needle-nose pliers.
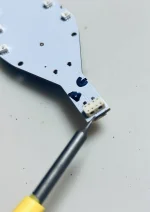
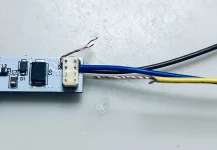
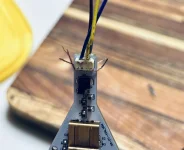
**Step 8:** Apply a small amount of superglue to connect each wire to its respective connector. Once secured, trim any remaining bare wire poking out of the hole with scissors.
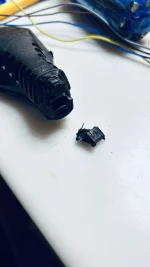
**Step 9:** From the black base of the turn indicator lamp, remove the small clip that holds the wires in place. You can reuse this clip, or seal the hole with adhesive sealant to make it waterproof.
Proceed to part 2
This tutorial is in two parts because I can only post 10 pictures per thread. Part two will have the other remaining photos and instructions.
I have had to repair my turn signal indicators three times now and got tired of paying $160 plus shipping each time to replace the indicator lamp. After my third break, I decided to try repairing it myself and had great success with this method. I hope this works for you and saves you money. The entire process takes under an hour, depending on how much you curse.
This method uses the materials listed below and does not require a soldering gun. If you are comfortable soldering wires and small electronic connections, go for it, as it provides a more permanent and reliable connection. If not, you can fix the entire device with glue and electrical tape.
Please note: I am not an electrical engineer or an electronics repair technician. I’m a middle school music teacher in Hawaii who spends most of his time surfing, not doing major repairs. If I can do it, pretty much anybody can.
Steps for Repairing a Broken Rear Turn Indicator
**Materials Needed:**
- Your broken indicator light and cable
- Superglue
- Scissors
- Carpet knife
- Cable crimpers and strippers
- Quarter-inch drill bits and drill
- Black Sharpie marker
- Bond welding glue
- Four strips of colored wire (preferably matching the colors used on the turn signal indicator; I cut four colored wires from a previous turn indicator)
- A wide needle or very thin torque screwdriver
- Flat pliers and needlenose pliers
- Small clamp
- Adhesive sealant
- Four insulated wire connectors
- Guitar pick or some sort of plastic separator
- Shrink wrap electrical tubing
Repair Steps
**Step 1:** Assemble your broken parts. Use scissors to cut any remaining wires connected to the turn indicator.
**Step 2:** Using a carpet knife, carefully remove the plastic cover from the turn signal indicator. This is one of the most difficult steps, as it’s easy to break the clear plastic cover. Work along the edges until the knife slices through the plastic. Once the edges are cut, gently use a guitar pick or similar plastic tool to fully separate the clear cover from the black plastic base. Take your time to avoid cracking the clear plastic.
**Step 3:** Remove the plastic cover, the white plastic cover over the LED board, and carefully pull out the LED signal indicator from the black plastic base.
**Step 4:** With the LED board out, label all the cable wires so you know where to reconnect them later. I used a Sharpie to write directly on the PCB, but you can also take a picture for reference. Note the positions of the yellow, blue, gray, and brown cables.
**Step 5:** If it hasn't already been sheared off, remove the small black plastic connector that connects the signal indicator case to the rear license plate holder. Use a quarter-inch drill bit to drill a hole through it for the wires to pass through.
**Step 6:** Use pliers to gently hold the two connectors attached to the LED board. Carefully enlarge the holes for the wires; do not grip too tightly to avoid cracking the connectors.
**Step 7:** Use a large sewing needle or a very fine torque screwdriver to widen the wire holes on the connectors. You should be able to pass four strands of wire through, but three is usually enough. Pull the wires through with needle-nose pliers.
**Step 8:** Apply a small amount of superglue to connect each wire to its respective connector. Once secured, trim any remaining bare wire poking out of the hole with scissors.
**Step 9:** From the black base of the turn indicator lamp, remove the small clip that holds the wires in place. You can reuse this clip, or seal the hole with adhesive sealant to make it waterproof.
Proceed to part 2